
How I Hacked JavaScript to Support Modules in My Client-Based Code Editor.
Some Background
About two months ago, I decided to start working on an entirely client-based code editor (Echo), as a challenge for myself and to also revisit core JavaScript features. The initial idea was to create a minimal code editor that runs HTML, CSS, and JS projects with a feature for people who prefer explaining code via visual drawings. This feature is integrated with Excalidraw, a virtual whiteboard tool that allows users to create hand-drawn diagrams and wireframes. Through this integration, users could select a piece of code and connect it to an Excalidraw element. Once connected, hovering over the code would highlight the linked element on the sketching tab.
Thankfully, I managed to implement all the essential features but wanted to scale the challenge further by adding more interesting functionalities. The first thing that came to mind was the ability to use React or other front-end frameworks. But can that be done easily through CDNs?

Framework Integration
I started by integrating our beloved framework React. Initially, I needed to find a fast and reliable CDN, so I opted for esm.sh, a modern CDN that supports ES6 modules.
<script type="importmap">
  {
    "imports": {
      "react": "https://esm.sh/react@18.2.0"
    }
  }
</script>
All I needed to do now is to choose how I want to compile the JSX code so the browser could understand it. The most popular compiler for React is Babel, but for a client-based app, compiling speed is crucial. Therefore, I chose Sucrase as it compiles JSX much faster, sacrificing old browser compatibility. Considering the nature of our app, this won't pose any risk.
With this in place, we now have the ability to run React code seamlessly in the browser. But what if we wanted to create independent components to later import them across React app files?
That wouldn't be possible because it's just a client-side app with files as records in a Zustand store. However, I had to come up with a solution.

Solution Overview
While we can't add imports and exports functionality the native JavaScript way, we can create our own implementation that mimics the same behavior by replacing the export and import declarations with our custom code.
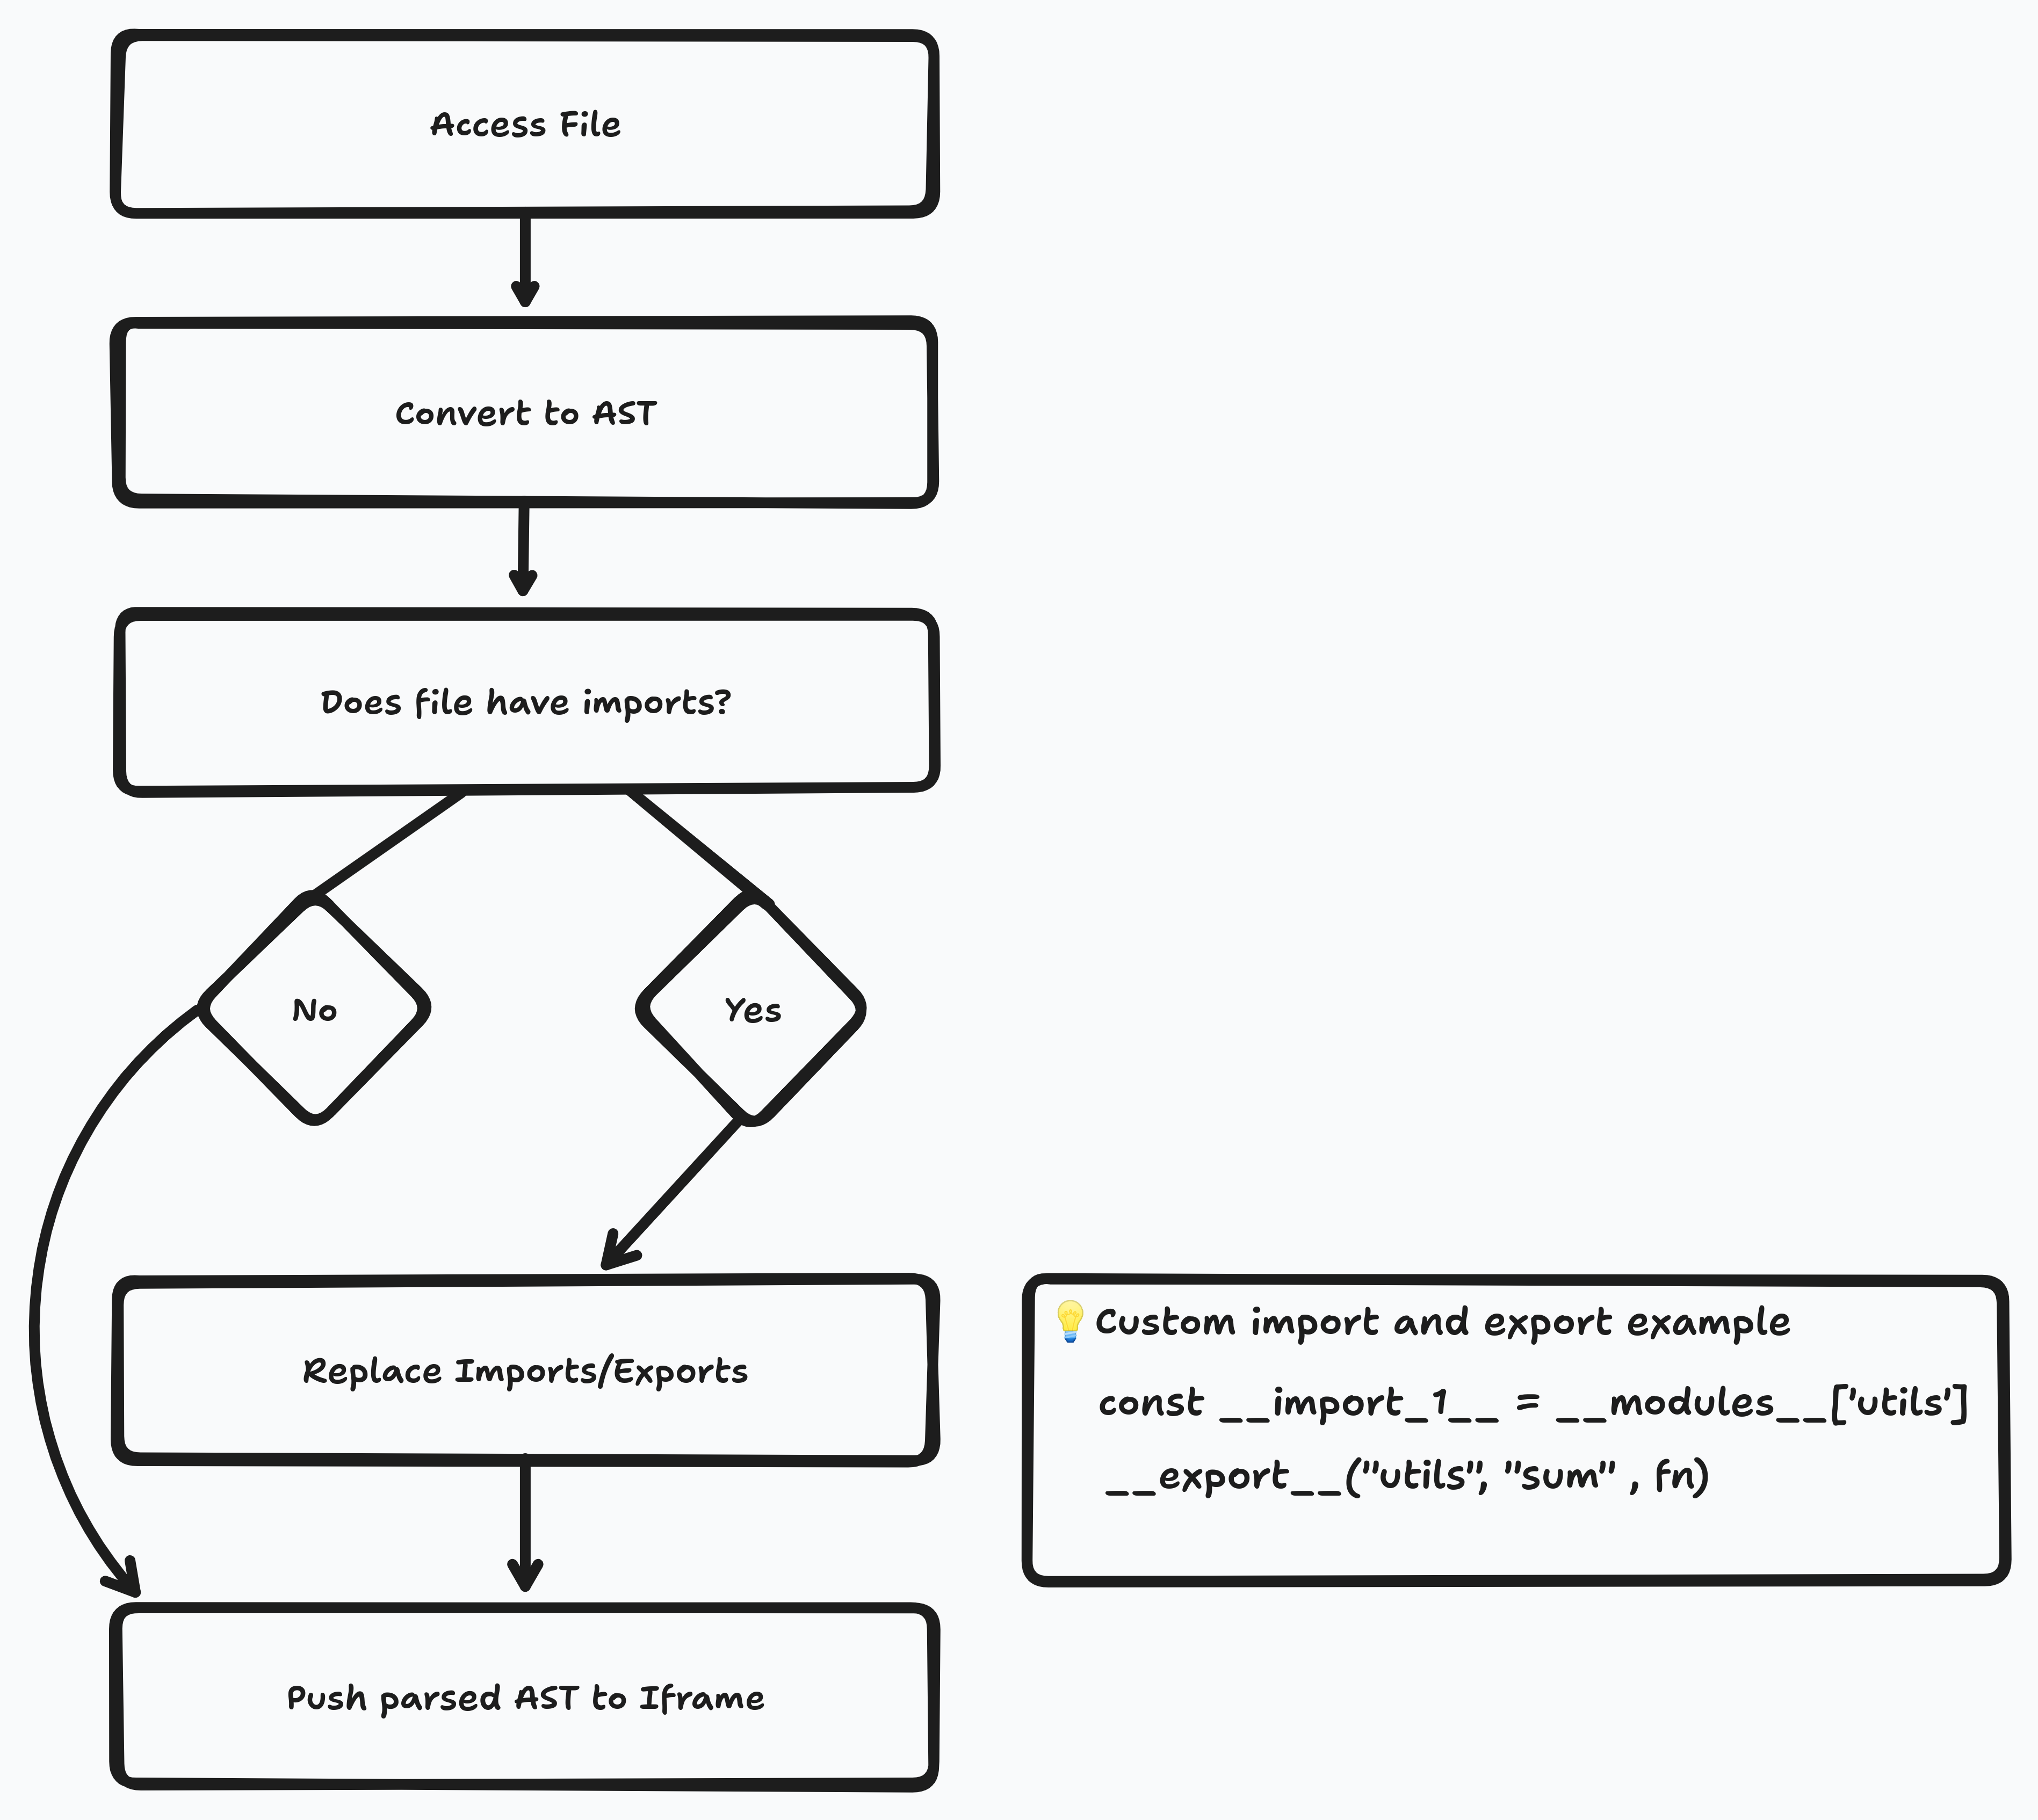
Converting the Code to AST (Abstract Syntax Tree)
An abstract syntax tree (AST) is a data structure used in computer science to represent the structure of a program or code snippet. It provides a tree representation of the abstract syntactic structure of text written in a formal language. Each node of the tree denotes a construct occurring in the text. It is used by formatting tools such as Prettier and ESLint to format or spot code errors.
We will start by converting our code to AST so it's easier to replace the built in export/import with our own functionality.
Let’s see how this basic code snippet looks like in AST format:
import { NAMES } from 'constants'
console.log(NAMES)
// AST
{
  "type": "Program",
  "body": [
    {
      "type": "ImportDeclaration",
      "specifiers": [
        {
          "type": "ImportSpecifier",
          "imported": {
            "type": "Identifier",
            "name": "NAMES"
          },
          "local": {
            "type": "Identifier",
            "name": "NAMES"
          }
        }
      ],
      "source": {
        "type": "Literal",
        "value": "constants"
      }
    },
    {
      "type": "ExpressionStatement",
      "expression": {
        "type": "CallExpression",
        "callee": {
          "type": "MemberExpression",
          "object": {
            "type": "Identifier",
            "name": "console"
          },
          "property": {
            "type": "Identifier",
            "name": "log"
          }
        },
        "arguments": [
          {
            "type": "Identifier",
            "name": "NAMES"
          }
        ]
      }
    }
  ]
}
As you can tell, it provides a detailed breakdown for such a small piece of code, allowing us to make thorough changes.
We will focus on the following AST nodes:
- ImportDeclaration: Refers to all types of import statements, differentiated through the
specifiersarray. We will be focusing onImportSpecifier(Named imports) andImportDefaultSpecifier(Default imports). - ExportNamedDeclaration: Represents named export declarations with a
specifiersarray of exported identifiers. - ExportDefaultDeclaration: Indicates default exports with a
declarationobject containing a single exported identifier.
I suggest using AST Explorer to explore the structure of different code pieces.
Injecting the custom logic
As mentioned earlier, we need to create our own import and export functionality. To achieve that we can utilize the window object, this approach allows us to store a custom export method and a modules object containing the exports of each file.
The export method requires three parameters: the file name, identifier value, and the function we want to export. The implementation is straightforward; we execute an assignment to the window’s __modules__ object, as shown below:
public _export(file: string, exportName: string, fn: () => void) {
    window.__modules__[file] = {
      ...(window.__modules__[file] || {}),
      [exportName]: fn,
    };
}
Next, we put this into action by making the following changes to the AST Nodes:
- Imports: We replace each import statement with a modules object, assigning the file path to an indexed variable.
const ___import_1__ = __modules__['utils']
// For default imports:
const ___import_1__ = __modules__['utils'].default
- Exports: Similar to imports, we replace the export statement with our custom method, passing the file path, identifier name, and the exported value as parameters.
__export__('utils', 'sum', sum)
// For default exports:
__export__('utils', 'default', sum)
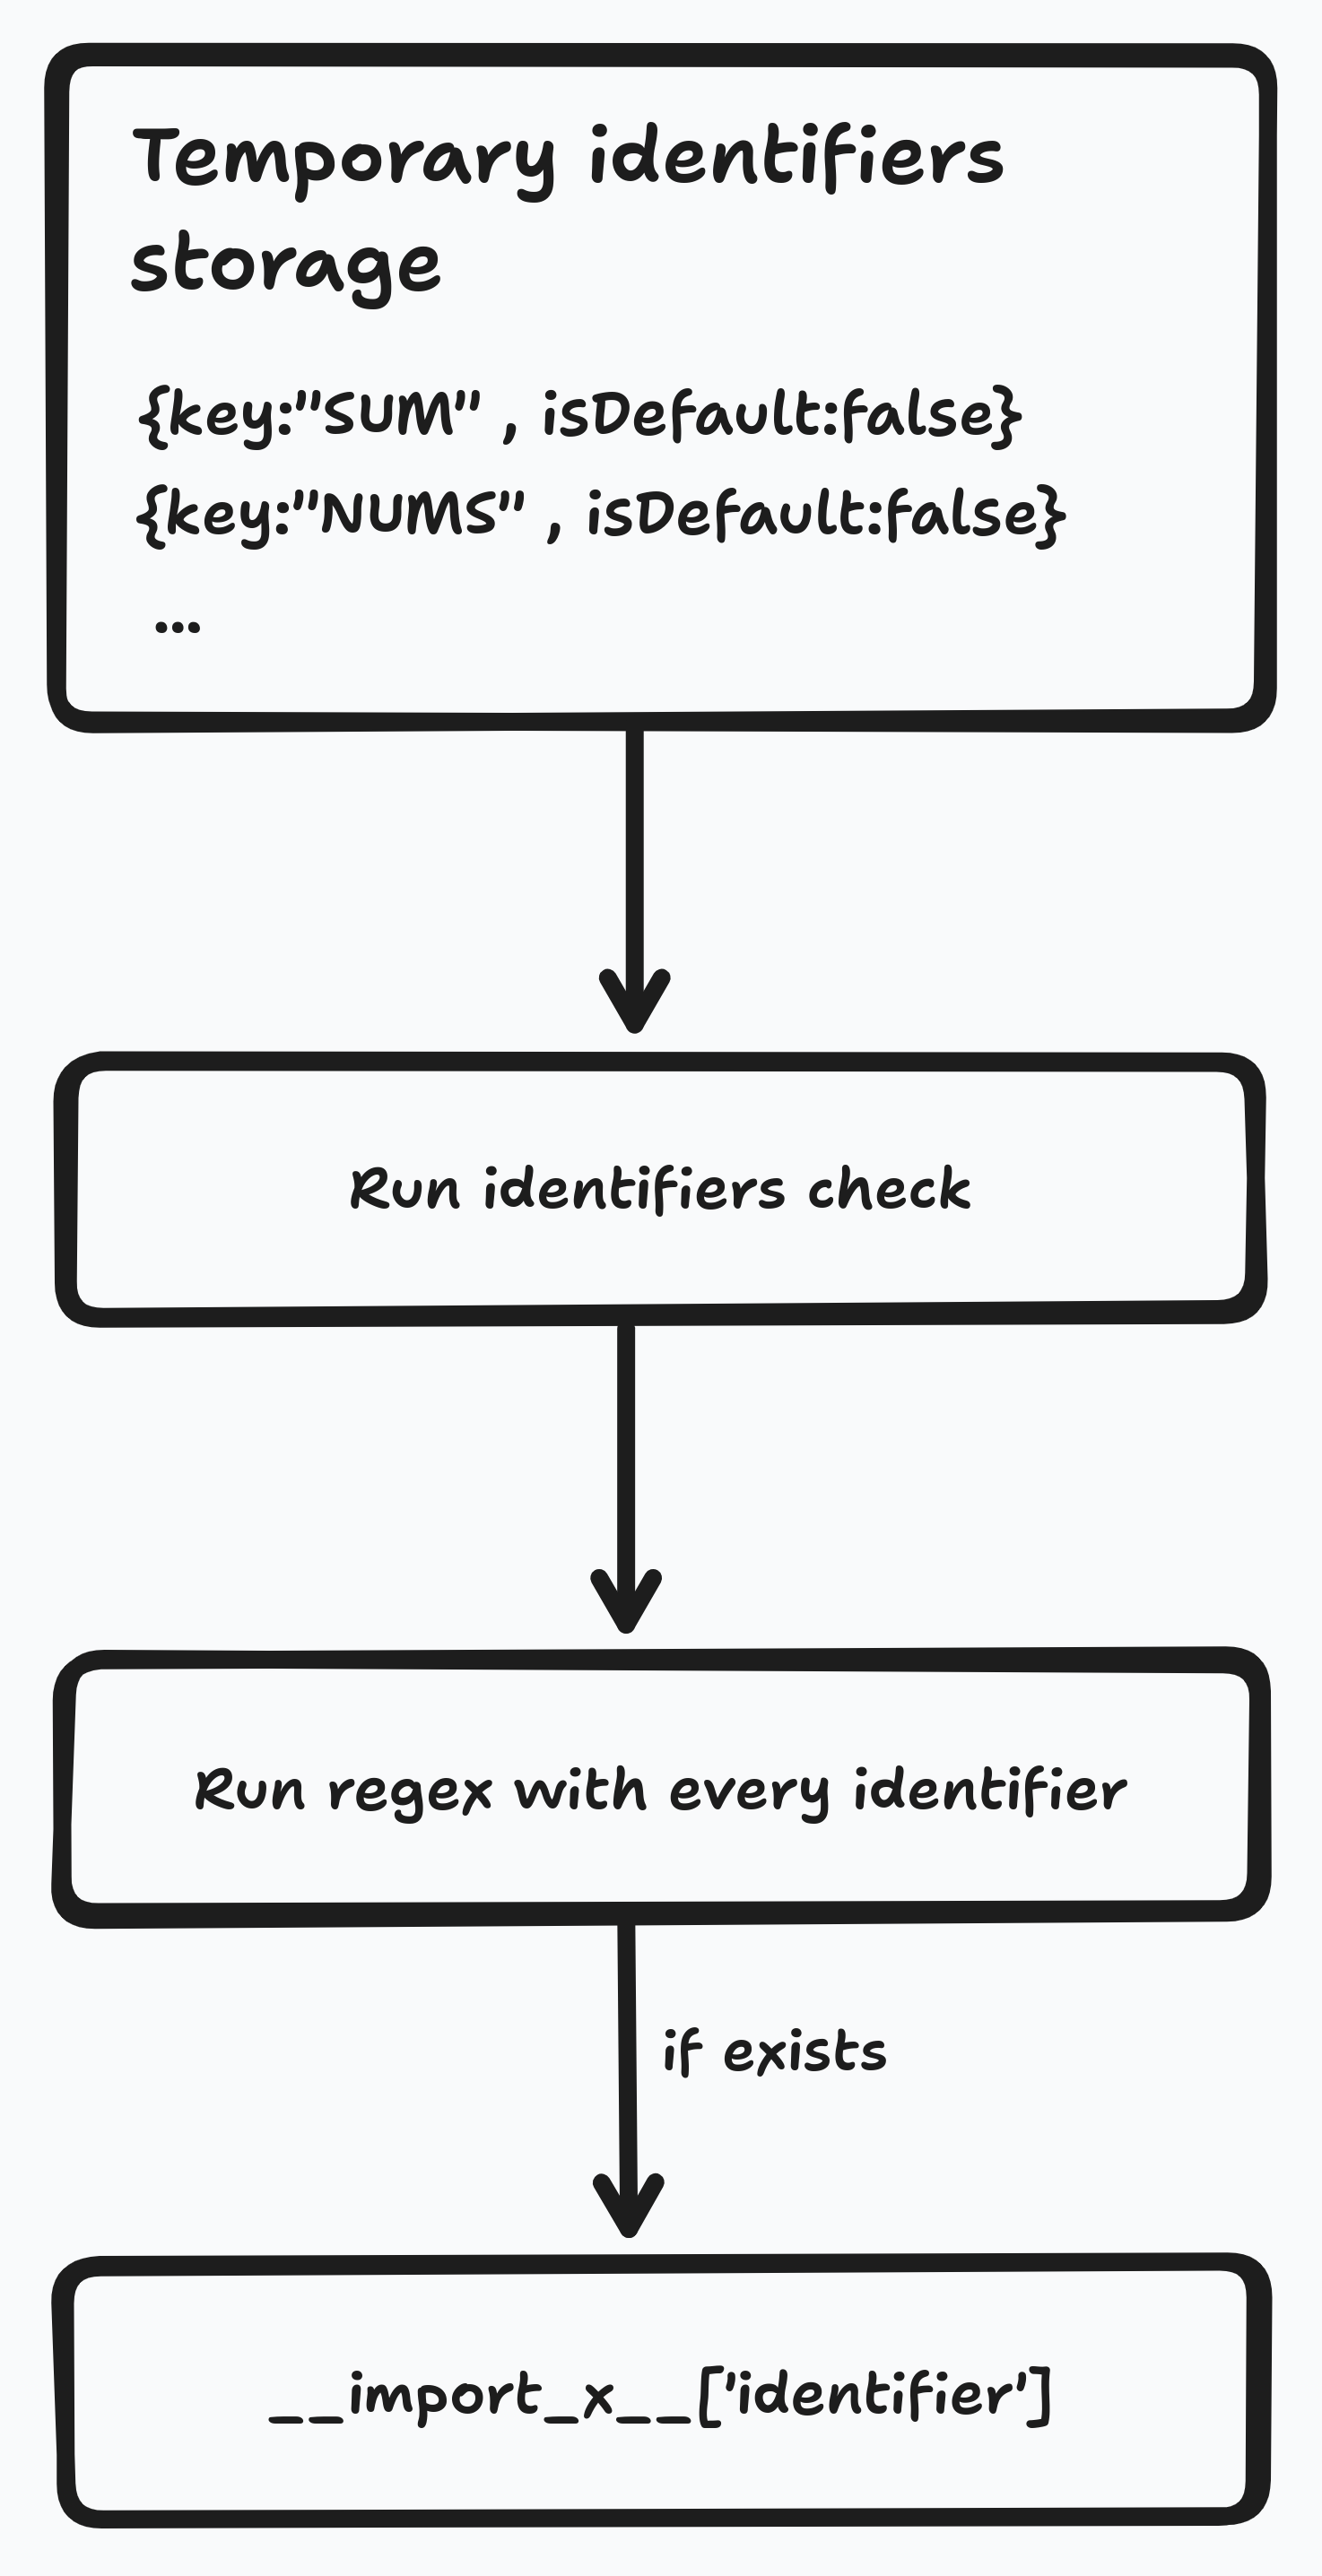
After implementing these modifications, the final step is to store all imported identifiers to replace them using regular expressions if used in the code.
Let’s now examine how the code looks before and after the transformation:
Utils File
export const NUMS = [1, 2, 3]
export const sum = (a, b) => a + b

// Transformed

__modules__['utils.js'] = {}
const NUMS = [1, 2, 3]
__export__('utils.js', 'NUMS', NUMS)
const sum = (a, b) => a + b
__export__('utils.js', 'sum', sum)
Index File
import { NUMS, sum } from './utils.js'
console.log(sum(NUM[0], NUM[1]))

// Transformed

const __import_1__ = __modules__['utils.js']
console.log(__import_1__['sum'](__import_1__.NUM[0], __import_1__.NUM[1]))
By now it should all make sense, we have a custom import system, instead of accessing the module we instead reach the data from the modules object that we stored in the window.
The final test
To round things off, let's walk through a React example importing App component that cotains a basic UI with some lodash functionality.
Summary
The journey of implementing this tricky solution reflects a fundamental principle: every challenge has a solution with sufficient effort. We discovered the power of leveraging built-in JavaScript functionality, notably the window object, to achieve a custom modules system.
It's important to note that this article provides a high-level overview of the underlying processes. I hope it gives a glimpse into how these functionalities work in practice.
Stay tuned for more articles about Echo. Perhaps in the future, I’ll consider open-sourcing it, allowing the community to benefit from and contribute to its development.